With its durability, ease of maintenance, and sleek, modern aesthetic, it’s no wonder there’s a growing interest in polished concrete floors across the city.
Polishing concrete isn’t just about achieving a shiny surface; it’s an art that requires precision, expertise, and the right equipment.
This blog post is designed to guide you through the process of polishing concrete, providing you with essential considerations, step-by-step instructions, and professional tips to ensure a flawless finish.
Whether you’re a DIY enthusiast looking to refurbish your living space or a professional seeking to broaden your skill set, we’ve got you covered.
From understanding the initial condition of your concrete to selecting the right tools and materials, we’ll cover everything you need to know.
Let’s get right into it.
The Brilliance of Polished Concrete
Polished concrete floors stand at the forefront of modern flooring solutions, offering plenty of benefits that cater to both aesthetic preferences and practical needs.
This service involves the mechanical grinding and polishing of concrete surfaces to achieve a smooth, mirror-like finish.
One of the primary benefits of polished concrete is its durability. Designed to withstand high traffic and resist wear and tear, it’s an ideal choice for both residential and commercial settings.
This resilience also translates to a longer lifespan compared to traditional flooring options, making it a cost-effective solution in the long run.
Another significant advantage is the ease of maintenance. Polished concrete does not require waxing or stripping; routine sweeping and occasional damp mopping is all it takes to keep the surface looking pristine.
This low-maintenance aspect is especially appealing for busy homeowners and commercial spaces that aim to minimise downtime and maintenance costs.
Its ability to reflect light can brighten up spaces, potentially reducing the need for artificial lighting and thereby lowering energy consumption.
Moreover, the versatility of polished concrete is unmatched. It can be customised with a range of finishes, from matte to high-gloss, and can even incorporate decorative aggregates, dyes, and stencils to create unique, personalised designs.
Learn more with our top resources:
- Choosing The Perfect Finish For Your Polished Concrete Floors
- How Long Does Polished Concrete Last?
- Concrete Grinding Vs. Concrete Polishing: The Best Option For Smoothing Your Surfaces
This flexibility makes it a popular choice for those looking to tailor their flooring to match specific interior design themes.
Polished concrete offers a combination of durability, ease of maintenance, sustainability, and versatility.
It provides a sophisticated, cost-effective flooring solution that meets the demands of modern living and working environments, setting a new standard for both beauty and functionality in flooring options.
Top Pros and Cons of Polished Concrete You Need to Know [Official Consumer Guide] 👈
Environmental Factors
Polished concrete is celebrated for its green credentials, offering an environmentally friendly alternative to other flooring options. The process capitalises on the existing concrete slab, reducing the demand for new materials and minimising waste.
Furthermore, its longevity means less frequent replacements, contributing to reduced resource consumption over time.
Another environmental advantage is its contribution to better indoor air quality. Unlike some flooring options that can emit volatile organic compounds (VOCs), polished concrete does not off-gas harmful substances, making it a healthier choice for indoor environments.
The reflective surface of polished concrete can also enhance natural light in a space, potentially reducing the need for artificial lighting. This not only saves energy but also contributes to a more pleasant and productive living or working environment.
| Kwikcut Tip: While polishing an existing concrete floor generally does not require permits, specific situations may necessitate them. If the project involves structural modifications, such as cutting into the concrete slab for installations or significant changes to the building’s interior, checking with local authorities in Perth is advisable. |
Matching Polished Concrete to Your Needs
Assessing Needs and Requirements
Firstly, evaluate the condition of your existing concrete slab. Factors such as cracks, stains, or uneven surfaces may require repair or preparation work before the polishing process can begin.
The extent of these conditions can influence your project timeline and budget.
Consider the functionality of the space where the polished concrete will be installed. High-traffic areas, such as commercial spaces or busy family homes, may benefit from a higher gloss finish for added durability and ease of maintenance.
Areas with less foot traffic might do well with a matte finish for a subtler aesthetic.
Tools and Resources Needed
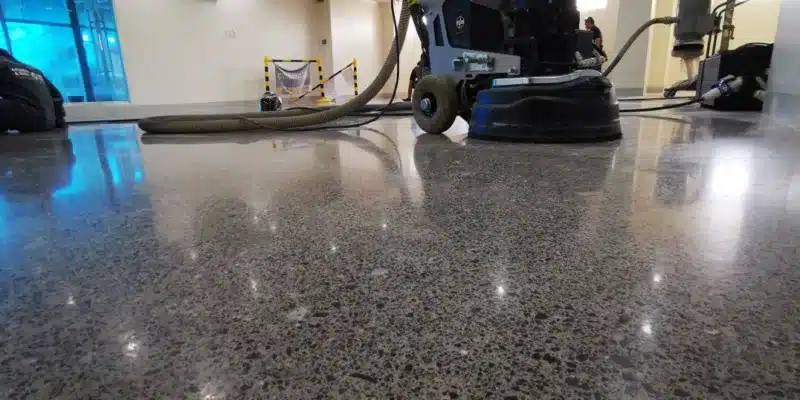
The tools and resources required for polishing concrete depend on the scale of the project and the desired finish level. Professional-grade equipment typically includes:
- Concrete grinders, equipped with diamond-segmented abrasives of varying grits, which are used to gradually smooth the surface.
- Concrete densifiers are applied during the process, to harden the concrete surface and prepare it for a high-gloss finish.
- Polishing machines, for the finer stages of grinding and polishing.
- Dust extraction systems, to maintain a clean and safe working environment.
For DIY enthusiasts, smaller, handheld grinding tools may be suitable for minor projects or touch-ups. However, for larger areas or achieving a high-quality finish, professional equipment and expertise are strongly recommended.
Step-by-Step Guide to Polishing Concrete Floors
Polishing concrete floors is a meticulous process that transforms a plain surface into a sleek, durable floor.
This guide outlines the steps involved, emphasises safety precautions, and highlights when it’s wise to enlist the help of a professional.
Step 1: Preparing the Concrete Surface
- Safety Precautions: Wear protective gear, including safety glasses, gloves, ear protection, and a dust mask or respirator.
- Process: Begin by removing any existing coatings, adhesives, or debris from the concrete surface. Fill in cracks and repair any significant damage. This initial step ensures a smooth base for polishing.
Step 2: Grinding the Concrete
- Safety Precautions: Ensure the area is well-ventilated. Use a dust extraction system to minimise airborne particles.
- Process: Start with a coarse-grit diamond abrasive to remove imperfections and flatten the surface. Progressively move to finer grits to smooth the concrete. Each pass should be overlapped by about half the width of the grinder to ensure an even finish.
Step 3: Applying Concrete Densifier
- Safety Precautions: Follow the manufacturer’s instructions for the application. Wear protective gloves and eyewear.
- Process: Once the initial grind is complete and the floor is clean, apply a concrete densifier to harden the surface. Allow it to dry as per the product’s recommendations.
Step 4: Polishing the Floor
- Safety Precautions: Continue to use dust control and personal protective equipment.
- Process: After the densifier has dried, resume grinding with even finer grits of diamond abrasives. This is the polishing phase, where you’ll start to see the concrete shine. Repeat with progressively finer grits until you achieve the desired level of polish.
Step 5: Final Touches
- Process: Apply a concrete sealer to enhance durability and provide stain resistance. Allow ample time for the sealer to dry before using the space.
Best Practices:
- Consistently check the floor for uniformity and smoothness throughout the process.
- Keep the grinder moving to avoid creating dips or gouges on the floor.
- Regularly clean the floor between steps to remove dust and debris.
When to Call in a Professional:
- If the concrete requires extensive repairs or if there are concerns about the structural integrity of the slab, it’s best to consult with a professional.
- The use of professional-grade equipment and the physical demands of the job can be challenging for DIYers. If at any point the process becomes overwhelming, or if the desired finish seems unattainable, professional services can ensure a high-quality outcome.
How to Choose the Best Concrete Polishing Provider in Perth 👈
How Much Does Concrete Polishing Cost?
| Component | Estimated Cost Range |
| Initial assessment | $0 – $150 |
| Concrete grinder rental | $250 – $400 per day |
| Diamond abrasives | $100 – $200 |
| Concrete densifier | $50 – $100 per litre |
| Polishing pads | $10 – $30 each |
| Concrete sealer | $100 – $200 per 5 litre |
| Professional labour | $50 – $100 per square metre |
| Total Estimated Cost | Variable |
Ready to Shine? Let Kwikcut Elevate Your Space
Whether you’re still mulling over your options or ready to dive into your project, the team at Kwikcut is here to help.
With a wealth of experience and a passion for perfection, our team is dedicated to bringing your vision to life.
From providing personalised advice tailored to your unique needs to delivering a flawless installation, we ensure your polished concrete project exceeds expectations.